Darkroom Chemistry and Photograms
While we're on the theme of not finding words (rrreference to the previous post), I have to talk about a completely new experience I had the fortune to have yesterday.
I'm in the process of getting all the stuff I need to be able to have a super-minimalistic darkroom at home. Just the bare essentials: paper, chemistry, trays, tongs, red safelight and, in a couple of days, an enlarger so I can make prints from my negatives.
I don't have the enlarger yet, but since I did get the paper and chemistry yesterday (shoutout again to Photax for being fast and reasonably priced!) I just had to experiment with it.
Photograms
Photograms are not quite photographs. Photograms are traces of shadows. If you place a coin on a light-sensitive paper and then turn on the light, the paper will be exposed everywhere – except under the coin, where the coin is casting a shadow.
If you then develop that paper, it will turn black everywhere except where the coin sat, where it will stay white. Then, as with film, you'll want to neutralise the developer on the paper and then fix the paper so it doesn't go bad.
But you don't have to put coins on the paper! You can put any object, like plants (this was how botanists who sucked at drawing catalogued plants back in the day; photograms are cheaper than photographs to make), scissors, butterflies, string … just about anything. If you put the stuff in a pleasing pattern, you actually get a work of art.
I've heard people say the result looks a bit like the x-ray prints you can get after you've had an x-ray, and that's not a bad intuition. Photograms on regular photo paper are basically x-rays except instead of x-ray light, they are sensitive to blue light.
It's obviously not a fantastic use of photo paper (which is kinda expensive) but it's fun to play a bit with. If you're making small photograms, you can cut a single paper into many pieces and do something different for each one.
My Experience
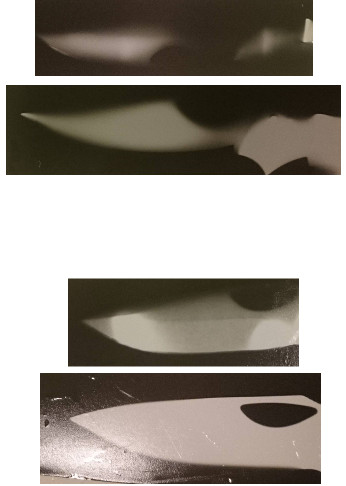
So, I tried making photograms to figure out the paper and the chemicals so I have some of that down when I get my enlarger later this week. This was my first experience with developing photo paper and more generally developing things under a safe light, which means I can see with my eyes what's going on the entire time. Here are my five attempts to capture the silhouette of a knife blade. (One small sheet of paper cut into five slices.)

Yes, one of those is entirely white. Sorry about the reflection on the last photo.
The first two are over-exposed (too much black), so I tried a really short exposure time. Turns out that under-exposed the paper – it's the white one. For the fourth, I found a decent middle ground, but I realised that I had an error in my procedure which meant pretty much anything would be overexposed. I corrected that for the fifth and final strip.
What was so amazing with this was developing the paper. If you have never seen photo paper being developed, you are missing out. I know the chemistry that goes into it, but it still feels like magic when I see it happen.
The silver turns black fairly quickly, but not uniformly. It's sort of a dark shadow creeping over the paper, turning more and more of it black. As it slowly turns black, more and more of the final picture is revealed.
"Dark shadow creeping over the paper" is the best way I can describe it, but it's highly insufficient to convey how cool it is. I'm at a loss of words.