Rebasing in Magit

I read Ian Whitlock’s article on why he can’t quit Magit and it inspired me to share more about Magit from my perspective. This article will focus on rebasing.
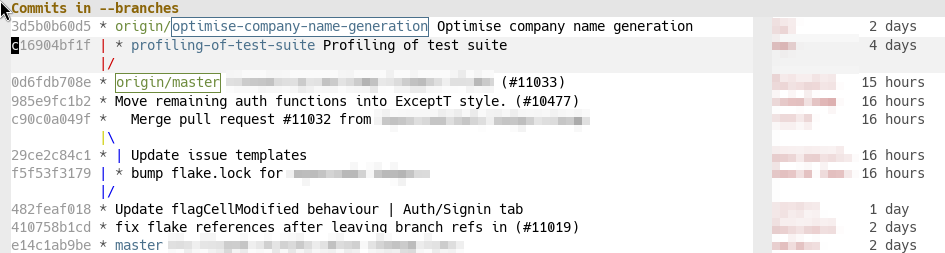
Your command centre: the git log
Here I have opened the git log1 I’m sorry about the mouse cursor – it’s an
artifact of selecting the area to screenshot., by first opening Magit (which I
have bound to the F3 key), and then pressing lL. The first l is the prefix
key for dealing with the git log, and the second L is to to view the log for
all local branches (and the remote branches they track.)
Hypothetically, if we wanted to run a more complicated log command, it is very
easy to do that in Magit. When we press the first l and pause for a moment,
Magit shows us unintrusive hints for all options that are available:
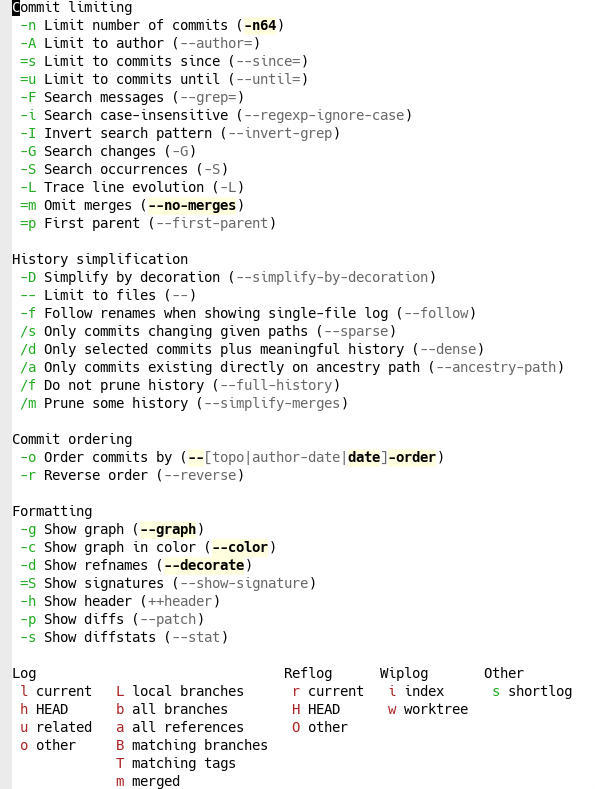
This means we don’t have to remember exactly which options there are because if we need them, Magit will remind us. Some examples:
- To limit to a particular author, we type
-Aand then Magit gives us a fuzzy-matching list of all repository authors. We can either browse that list, or type the name of the author we are interested in and press return to confirm. - To limit the date range of the log, we type
=uand then Magit gives us a calendar view in which we can select a date, or type one manually. - Then we want a graph view with colour and decorations and no merge commits. This is already enabled by default in this configuration. (Indicated by bold and highlighted flag names.)
- We want to see file diffstats, so we type
-s. - Oh, and we only care about files in the
testssubdirectory, so we type--to limit to files and then typetestsand confirm with return.
With this configuration, we want to look at all branches, including remote ones.
We get that view by finally pressing b.
This is a high level of discoverability for git! I have always been that guy listed in git.txt, but Magit’s discoverability still teaches me a lot of new ways to use git. But it’s not only discoverable, it’s also quick. Here’s the full sequence of keypresses, with ␍ standing for confirming with return:
l-Akqr␍=u2025-06-01␍-s--tests␍b
That looks complicated, but remember how we built it: we looked at the hints and selected one option at a time. Now, if this is a log type we’ll use often, we are going to start to be able to write out that incantation without even looking at the hints. It’s both discoverable and efficient.
The corresponding git command in the shell would have been
$ git log --branches --remote --author=kqr --until=2025-06-01 \
   --graph --color --decorate --no-merges --stat -- tests
How do I know? Because it’s right there in the Magit log hints! If Magit hadn’t told me, I would have to spend a lot of time going back and forth between the man page and the command line.
People worry that if you use more interactive interfaces to git, you’ll get worse at managing the git command line. Not so with Magit. Magit is completely transparent and encourages you to understand which git commands it is executing under the hood.
This might seem like an excessive rant about the git log in an article ostensibly about rebasing, but there’s a reason for that: the git log is how we’ll understand the structure of our repo. And because in Magit, the git log is interactive.
Rebasing from the log
As a reminder, this was what we were working with.
We want to rebase the profiling-of-test-suite branch on top of
optimise-company-name-generation. We can tell that the current branch is
optimise, because it’s surrounded by a blue box.
We have placed the text cursor over the profiling branch (it is highlighted in
grey), so we can switch to that branch by pressing bb␍. The first b is for
checking out, the second b is for branch, and the fuzzy-matching list will
default to the branch under the cursor in the log view. When we have done so,
the box will jump over to the profiling branch, indicating we have switched to
it.
Then we move the cursor up to the optimise branch, and press re␍. The r is
for rebase, the e is for “elsewhere” (i.e. not on top of the upstream), and
the fuzzy-matching list again defaults to the commit under the cursor in the log
view, so we can confirm with return.2 As a reminder, if we’re ever unsure, we
can type only the first letter and Magit will show us hints. (For example,
adding -i will make the rebase interactive.)
That’s it! The log updates to show the profiling branch on top of optimise.
New here? I write about tools, techniques, and skills that are useful for software product development. You should subscribe to receive weekly summaries of new articles by email. If you don't like it, you can unsubscribe any time.
If we have a more complicated, interactive rebase, we get an editable list of
commits with convenient hotkeys for performing rebase operations, like k to
discard, f to fixup, w to reword, s to squash, etc. There’s also a list of
supported operations under the commit list, if we forget what operations are
available.3 For example, I almost never create new commits when I rebase, nor
do I create merge commits. But you can do it.
What did it just do?
If we want to know which command Magit executed, we can press $ and we get the
Magit command log, where Magit lists every git command it executes. In this
case, it will show
git checkout profiling-of-test-suite
git rebase --autostash optimise-company-name-generation
… huh, what is --autostash and why does Magit default to it? Let’s look it up
in man git-rebase:
--autostash
Automatically create a temporary stash entry before the operation begins, and apply it after the operation ends. This means that you can run rebase on a dirty worktree. However, use with care: the final stash application after a successful rebase might result in conflicts.
Okay, yeah, that does make sense as a default. I frequently rebase with a dirty worktree and it’s nice to not have to stash manually.
This is another way in which Magit can teach us to be better at git. I would not
have known about --autostash if Magit hadn’t defaulted to it. This is also how
I learned that --force-with-lease is strictly better than --force, but few
people know about it.
Other git interfaces
This was not a complicated operation. We could have done this through the git command line. It would have been trivial, in fact – we just saw the two commands Magit executed under the hood. But by doing it through the interactive Magit log view, we gain a much better intuition and understanding for what effect the commands have. When we get comfortable with Magit, we will start to execute more complicated commands, which we might not have the confidence to do without the clear presentation of the interactive Magit log.
Of course, there are other graphical git interfaces, and we could have done this rebase through any of them. But then we wouldn’t have learned as much about git as we did.
Magit sits at a perfect point in the solution space where it is basically just a thin wrapper around the git command line, and is not ashamed of that. Yet it augments the git command line with interactivity, discoverability, and efficiency that is difficult to find elsewhere.
We have seen only a glimpse of it here – wait ’till you hear about how easily Magit lets us stage, unstage, revert, reset files, hunks, or even parts of hunks interactively.